You must have arrows that are straight if you wish for your arrow to perform well. Getting from that raw gathered shaft to a straight shaft and ready for spine reduction is a very important step. This step is one that most traditional and new primitive arrow makers take for granted since they did not have to do this before. They may have had to slightly straighten an arrow that bought from a supplier but these were usually gentle bends that need to be performed.
Straightening arrows may be the best way for a beginner to ruin a shaft in all of the production stages. I know when I started making primitive arrows I literally cooked the wood in some areas I wanted to heat straighten. I also green straightening a shaft too fast will cause massive splitting and checking, which could destroy the shaft.
There are basically two methods you can use for straightening your primitive shafts. There is the green straightening method and heat straightening. It is general thought best to straighten them as they dry. This usually makes a better shaft and cause less problems in some woods but is not needed for all woods. Most woods can be dried slowly and heat straightened at the arrow maker’s convenience.
The green method of straightening is very easy to perform. To do this you must grab the shafts and flex them to make them look straight. You will learn how far you can flex the green shafts and how much stress they can take green after you break a few. The wood can only take so much stress at one time so try bending it several times and not all at once. This is where the hard, quick bends will destroy shafts. If the shaft does not respond well to green straightening and you feel like it will break, do not worry, it will do better with the second method.
 Picture 1
In picture one we see a good method for straightening green arrow shafts. Some times the simplest ways are actually the best.
There are two ways to green straighten your shafts. They are with the bark on and with the bark off. That all depends on the material you are using and the thickness of the shafts that you gathered. Many shafts must be dried slowly with their bark on or they split severely and are useless. While some others may be gathered and have the bark removed immediately.
Some woods, if small enough, can have their bark removed immediately and will dry and straighten very fast. Most woods will split or check once the bark is removed. The checks usually develop within about 24 hours and shortened the useable part of this shaft considerably and even ruin it altogether.
Once the bark is removed the wood requires to be straightened about twice a day. I prefer morning and night as it meets with my work schedule. The shafts will take very little straightening right after the bark is removed. The wood returns to its original bends very soon after it is left alone. But after some of the moisture starts to leave the woods it will start to stay in the shapes you bend it to. This straightening with the bark off should only be a few days at the most. The small arrow sized wood looses moisture very fast and should be set to its shape with in about 3 days.
Picture 2 shows what happens to arrow shafts that dry too fast. This shaft is of Southern Arrowwood and was debarked will green and developed drying cracks.
The woods that can not have their bark removed from the while drying take much longer to dry. Some will require a month or more to become totally dry and this all depends on the humidity where they are drying. The green fresh wood will not take to straightening right away. You can try to bend them straight and bundle them with rope or twine for several days. Then they need to be unbound and bent back into to straight from and rebound again. This will need to be repeated over again until they stay straight. The wood shafts with the bark on will dry fastest on the end and will set there first. When using this method you must try to make sure the ends are as straight as possible first. The shafts do not dry evenly like the shafts the bark off will. If you use this method you will most likely get caught unprepared and have to heat straighten some areas until you get the hang of it.
I have read several Indian books about bundling shafts and hanging them to dry over the fire for several months untouched. This method never worked for me as the shafts shrink in diameter as they dry and loosen the string on the bundle. This lets them bend back to their former bends and not stay straight very much at all. When I used this and did not straighten and rebundle them they needed to go through heat straightening anyway. I found that if I only bundled them once I might as well have had them air dry unbundled and heat straighten he bends later. If you wish to use bundling with green straightening then working them every few days is a must. The advantage to bundling is that you can leave the unattended for several days and they will be held straight until you have time to spend on them again. This works well for busy schedules like I had when I was a service technician and the job kept me busy for 12 hours some days.
There are some woods that perform better using the green method but are naturally wavy like the Rose family of woods. Most of the Rose family of woods makes a good arrow but does not heat straighten very well. I have had some shafts of these materials split with the grain on any thing more than light heat straightening. They seem to be the direct opposite of most woods I have made arrows from. The can have their bark stripped of immediately and green straightened in a few days as long as they are too overly thick. Where as most woods would split open down its entire length.
I have made many arrows from Multiflora Rose and green straightened them as they dried only to find there was small wiggles down the entire shaft. It was relatively straight over all but had appearance of being “snaky”. These arrows shot as well as any others and never showed a problem with in accuracy like a poorly made arrow. It worried me at first but then I became accustomed to my “crooked” arrows. It was always a lot of fun to show them to other archers at shoots. They never think you can hit anything with arrows that have wiggles in them. It reminds me of a picture I saw of two older gentlemen showing off their true snaky arrows.
Green straightening can also be performed on most other woods that can not be dried with their bark off. To straighten the other wood you need to store them and monitor them as they dry. I usually can tell with most woods as they dry by feel of how they want to start taking the bends you induce on them and how the bark starts to wrinkle as the shaft is drying and shrinking. When you can see these signs or something similar to them the wood has lost enough moisture and is ready to start green straightening. You can now remove the bark from the shafts and proceed with green straightening as described earlier. Now the shafts should have lost enough moisture and shrank enough to not split open and be ruined
The second method of straightening shafts is to use heat. This is the way to straighten shafts that are already dry or did not get completely straight using the green method. There are many ways of applying heat to your shafts. I use a candle flame as it is similar to using a fire or coals like our ancient arrow-smiths would have done. I have seen people use hair dryers, wood stovetops, electric stove elements, and a special burnishing procedure I will explain later. There are may as many different ways to heat your shafts as there are ways to produce heat. So I will explain the basics and you will find the way that works best for you or your material your making arrows from.
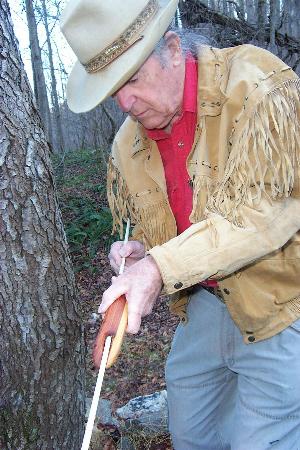
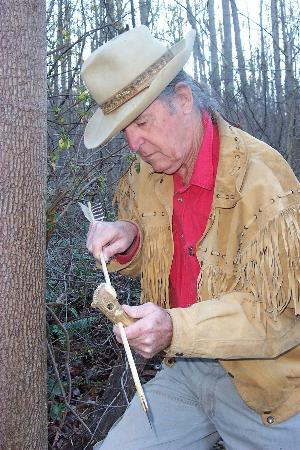
Pictures 3 and 4 are showing an arrow shaft being straightened with heat. In Picture 3 we can see the arrowsmith using a candle to apply heat to the shaft. In Picture 4 we can see him again using an arrow wrench to straighten the shaft after applying heat to the spot on the shaft that he was trying to straighten.
 Picture 6
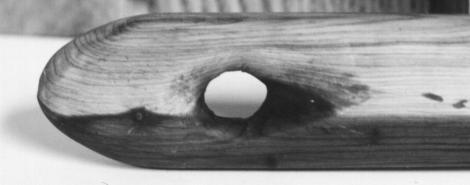
Pictures 5 and 6 are arrow wrenches used mainly in the straightening of heated shafts. The wrench at the top I had carved from a Red Cedar tree and gave it a long slow taper as not to press creases into the wood. The wrench in Picture 6 was made by Jim Roane and is made from Elk antler. It has a hole drilled through it for sizing and straightening new shafts and a hole with the side cut out to allow a finished arrow to be straightened.
To start this way you will need a heat source, some grease and an arrow wrench. The candle will apply the heat and the grease will help to prevent scorching of the wood while heating. It is not necessary to use grease but it help to prevent in scorching the shafts and any kind of grease or oil can be used. I just happen to enjoy bacon and the grease is a natural side effect. Rotate the wood back and forth in front of the candle flame, or heat source, at the spot to be bent. The wood will begin to become very flexible and bend easily as it gets hot. When the wood feels, as it will burn you to the touch, it is ready to be bent. Once it is hot you can bend it with your hands or across your knee. The arrow wrench works well for the short bends and flexing with your hand works better for longer bends. Bend the shaft slightly passed straight and it will come back to straight. Keep looking down and spinning the shaft until you get all bends taken out. Try to not apply heat in the same spot for too long or too many times. Do not over heat the wood. Overheating will cook the wood and destroy this section making the arrow shaft brittle and useless. All spots that you think you may have scorched must be flexed several times to ensure it will not break. Once you have finished with heat straightening the shafts need to rest for about one or two weeks.
 Picture 7
In Picture 7 you can see the shafts at the top that have gone through the first heat straightening process. They are not completely straight but are very close. The shafts on the bottom are how bent some of the shaft at the top were.
The shafts at the bottom are air-dried loosely on my workbench with only the bark removed after they were dried. They may look fairly crooked but will straighten out just fine. If you notice they all have slow gentle curves and not hard sharp ones. Then, when you pick them back up, they have readjusted to the new stresses and are not as straight as they used to be. Now is when they need to be straightened the second time. Repeat the process for applying heat as described above and get them straight again.
Pictures 8, 9 and 10 show a few different way for checking your arrows shafts for straightness. On picture 8 we would lay our shaft on a flat table top and you can see where the shaft in bent by the gaps it between it self and the table top. A better example of this is in Picture 9 where you can see the nock end of the shaft slowly raising off the table. Sighting down the arrow
 Picture 10
Pictures 8, 9 and 10 above show different ways of checking an arrow for straightness.
Straightening Cane and Bamboo
To start, the nodes must be sanded down to make them flat for good shooting. Then a candle or other heat source to apply the heat for the straightening. All nodes are to be straightened first as they are thicker and will be harder to straighten. Just align the shaft on each side of the node to align straight. The nodes are the toughest to bend and can pull the bends back between the nodes if the nodes are not done first. Once the nodes are straight you should start to work on the area between the nodes.
I have been told that old arrow smiths would tie up river cane shafts at one end from the rafters of a garage. The other end would have a rock weight tied to it. It was said that they use gravity to stretch the shafts straight as they dried. I would try it but where I live River cane does not grow naturally. Once it is shipped to me it has several days drying to it already.
From time to time the shaft that you have finished might fall out of being straight and need to be touched up. Picture 7 below shows a wrench that can be used to restraighten the shafts. Notice how wrench is used to apply leverage to bend the shaft straight.


Have access to salt cedar (tamarand) can bark be stripped before drying? Would like to cut nock out and use the stone hang method. You think that would work?
LikeLike
Many woods cannot be stripped before drying and I have not had access to salt cedar to use it. S. Arrowood would split if I did it and Multiflora rose could be stripped right away and straightened in the sun as it dried and was fine. You’re going to have to experiment with it and report back.
LikeLike
I just harvested a section of rose wood for an arrow, but it has a bend and I have absolutely no idea how to fix it without damaging the shaft itself. I cut it a couple days ago and what do I do? I don’t want to hurt it and ruin the shaft
LikeLike
The rose wood I used responded better to wet green straightening. You could heat straighten it, as long as it is not too aggressive. On hard bends on Multiflora rose I had the grain split sometimes on heat straightening hard bends.
LikeLike